


How Hytale Generates Its Worlds: Biome Tiles, Warped Noise & Prop Grids
Hytale launched into early access on January 13, 2026, running on a world generation system its own developers call a prototype. Eight days earlier, Hypixel’s world generation engineer Dan and designer Amber had described its replacement in a post called The Future of World Generation. World Gen V2 is node-based. Every biome is a tile, the terrain blends across the seams, and props land on a procedural point grid. As of mid-October 2026, V2 is still being built for Hytale 1.0, but Hypixel has published enough about it, including an official node reference, to see how the pieces fit.
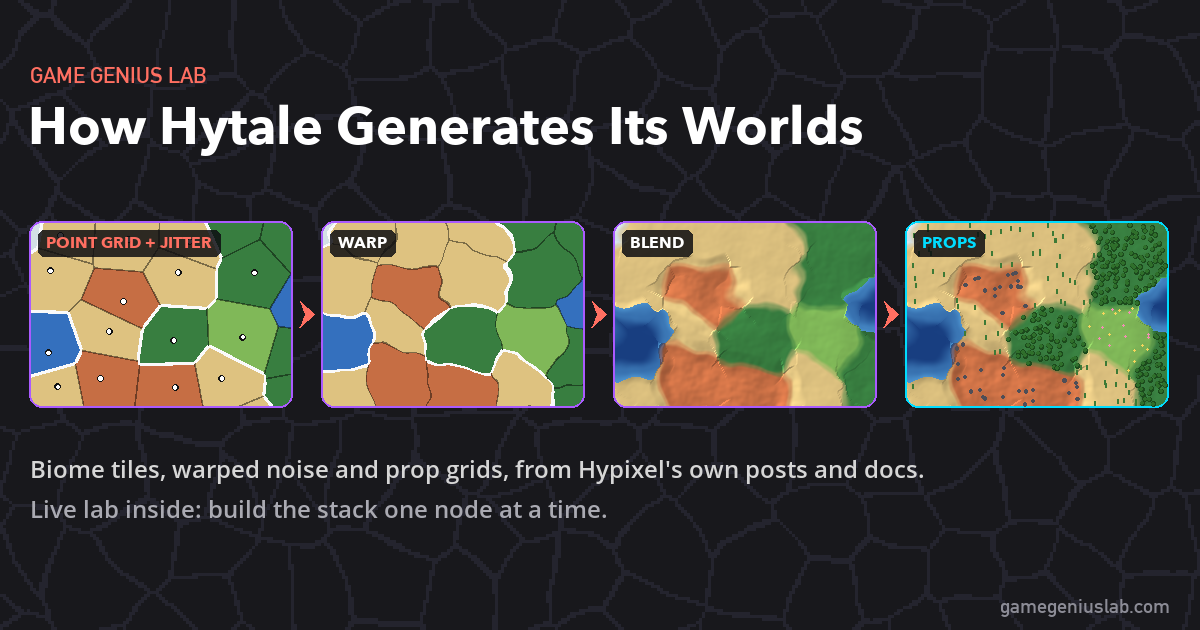
This post walks through Hytale world generation as Hypixel describes it, and labels where each claim comes from. Then you’ll build the same kind of stack in a live lab: a point grid, jitter, a warp, cell noise, edge blending and props, each one a node you can switch off. If you want the full build, our companion tutorial on procedural biome generation covers it step by step.
A note on sources: Hypixel’s own words come from two places: its news posts on hytale.com and its developer docs on docs.hytale.com (Release 0.7.2 at the time of writing). The community site HytaleModding mirrors those docs and adds guides of its own. When something below is our reconstruction rather than Hypixel’s design, we’ll say so.
Where Hytale World Generation Stands (October 2026)
- 2016 to 2020, V1: Hypixel calls V1 a prototype that taught the team what its generation needed. Work on V2 started in 2021.
- January 13, 2026, early access: Exploration mode shipped on V1. V2’s new world, Orbis, could be previewed through Gateways.
- January 24, Update 2: V2 was prepared for public documentation for modders, and new flat and void world templates were built on it.
- July 16 and 29: Game director Simon wrote that the groundwork for graph-based generation was in place, with procedural caves first and dungeons, villages, rivers and roads later. Two weeks later, a Community Spotlight said V2 is being built for 1.0, will replace V1 once Orbis is ready, and will arrive in pieces rather than with one switch.
- October 12, Update 7: The modder patch notes updated the public generator docs, made V2 size its working context dynamically so that new biomes and points of interest cost the rest of the world less, and reworked several density nodes. Hypixel still describes its V2 Orbis content as a work in progress.
There’s no official date for V2 to take over. Hypixel says old V1 worlds will stay playable, and V1 will eventually stop generating new chunks.
Biomes as Tiles, Zones as a Patchwork
Think of a patchwork quilt. Each patch is cut from one fabric, patches are sewn into bigger blocks, and the blocks make the quilt. Hypixel’s January post describes V2 the same way: each biome is its own tile inside a zone, and each zone is a tile in the world’s patchwork.
Tiles are a content decision as much as a math one. Hypixel’s docs describe a biome as a mostly self-contained bundle of terrain shape, block materials, props, environment (weather, NPC spawns, sounds) and tint colors. The only shared piece is a set of base heights. A designer can build or rework one biome without touching the others, and a broken biome stays broken in one place.
How the Docs Place Biomes
The World Structure asset decides which biome goes where. It reads one density field, a number at every position, and checks which range that number falls into. Each range maps to a biome, and anything outside every range gets the default biome.
Cell noise is a natural way to get tiles out of that. Hytale’s CellNoise2D node is a Voronoi cell field, and in its CellValue mode it returns one constant value per cell. Feed that into the ranges and every cell becomes a single-biome tile. A Jitter setting pushes each cell’s center off a regular grid. That’s the core of our lab below, but it’s our reconstruction: Hypixel hasn’t published the graph Orbis actually uses. If cell noise is new to you, our Voronoi tutorial builds it from scratch.
Warped Noise: Bending the Seams
Picture the tile map printed on a rubber sheet. Stretch and pinch the sheet before you look at it, and the straight borders turn into coastlines. That’s domain warping.
In Hytale, terrain starts as a density field: a number at every point. The docs say positive values are usually solid and negative values are air, and that combining a set of heights with a noise field produces most of Hytale’s terrain. Nodes like Sum, Mix and Normalizer combine and reshape those fields, so a stack of nodes is really a stack of math on numbers.
Warping is one of those processing steps, and the node reference lists three warp nodes:
- GradientWarp pushes one field along the slope of another. It’s powerful, and the docs flag it as expensive.
- FastGradientWarp uses a built-in simplex noise, and its
WarpFactorcaps how far a point can move. - VectorWarp pushes points along a vector, scaled by a second field.
The October update removed two old 2D options from GradientWarp, a sign that this part of the system is still moving. Our lab uses the simpler domain warp that Inigo Quilez popularized: offset each sample point by two noise values before you look it up. It’s not Hytale’s node, but on a tile map it does the same job, making borders wander instead of running straight. The noise is the Perlin class from our Perlin noise tutorial. Hytale’s terrain noise nodes are simplex noise, and the companion tutorial covers the difference.
Edge Blending: No Cliffs Between Biomes
Tiles have a catch. Where two biomes meet, their terrain recipes disagree, and a flat desert next to a tall mesa makes a wall. Hypixel’s January post says the terrain shape transitions from one biome to the next across the border, and that biomes can also reshape the terrain near their own edges.
The docs show the knobs. DefaultTransitionDistance sets how many blocks it takes for one biome to turn into the next, and the terrain inside that band is interpolated between the two. Its suggested starting value is 32 blocks, and the docs warn that bigger values cost performance. A DistanceToBiomeEdge node tells a biome how far it is from its border, which is how you’d fade a forest out or raise a ridge along the edge.
In the lab, Blend does the same job. Within that many blocks of a tile edge, the height eases from one biome’s recipe to the other’s. It starts at 32 blocks, too.
Lab: Build a Biome Tile Stack
Here’s the whole stack: a point grid, jitter, a warp, cell noise, blending and props. Click any node to bypass it, or change the seed to grow a new world. Every size is in blocks on a 768×480 map.
Lab: Biome Tile Stack
👉 Try this: switch to Tiles and bypass Jitter, and every tile snaps to a square. Turn Jitter back on, then bypass Warp and watch the borders go straight. The white lines are zone borders. They always follow tile edges, because each tile joins whichever zone its point falls in. Next, switch to Height and bypass Blend: the soft ramps between biomes become steps. Finally, press Animate Warp and watch the borders drift while every tile keeps its biome.
How the Lab Maps to Hytale’s Nodes
| Lab node | What it does here | Closest node in Hytale’s docs |
|---|---|---|
| Point Grid | One point per tile-sized square | SquareGrid2d, scaled up |
| Jitter | Moves each point off the grid | Jitter2d, or CellNoise2D’s Jitter |
| Warp | Offsets each lookup by two noise values | FastGradientWarp or GradientWarp (they push along gradients instead) |
| Cell Noise | The nearest point picks the tile | CellNoise2D or PositionsCellNoise in CellValue mode |
| Blend | Eases the height within N blocks of an edge | DefaultTransitionDistance, DistanceToBiomeEdge |
| Props | A jittered point grid, filtered by biome rules | Positions, Occurrence, Scanner and Pattern, Prefab props |
The “closest node” column is our mapping, not Hypixel’s.
Props on a Point Grid
Trees, rocks and grass don’t come from the terrain math at all. Hypixel’s January post says props are spread over a custom procedural point grid, with a set of rules choosing the best placement at each point. A prop can be a prefab someone built by hand, or generated procedurally.
The docs fill in the parts:
- Positions: providers start from infinite grids, such as
SquareGrid2dandTriangularGrid2d, spaced one block apart. You scale them up and jitter them. - Occurrence: throws positions away at random, with a density field setting the odds, so props can clump.
- Scanner and Pattern: a Scanner searches around each position, and a Pattern decides what counts as a valid spot, like a floor to stand on.
- Prop types:
PrefabandWeightedprops decide what actually gets placed.
The lab does a small version of this. It makes one candidate every Prop spacing blocks, jitters it, and keeps it if the biome allows that prop and a clumping noise agrees. Candidates under water are skipped, which is our stand-in for a Pattern. A jittered grid is the cheap cousin of Poisson-disk sampling. Coverage is even and there are no neighbor checks, but two props can still land close together. We’ll cover Poisson-disk placement in an upcoming tutorial.
Build a Tiny Version Yourself
Here’s the stack behind the lab, unedited: about 120 lines of JavaScript. It uses SeededRandom and Perlin from our Perlin tutorial, so the same seed always builds the same world. Hytale works in 3D, but a 2D height map is enough to see every idea.
// Every biome is a self-contained recipe: a base height, how rough it is, and what grows there.
const BIOMES = {
  meadow: { color: [128, 184, 88], base: 0.10, rough: 0.10, prop: "flower", chance: 0.30 },
  forest: { color: [56, 126, 64], base: 0.16, rough: 0.16, prop: "tree", chance: 0.90 },
  lake: { color: [52, 112, 190], base: -0.30, rough: 0.06, prop: null, chance: 0 },
  desert: { color: [222, 194, 128], base: 0.08, rough: 0.08, prop: "cactus", chance: 0.14 },
  mesa: { color: [198, 110, 68], base: 0.42, rough: 0.30, prop: "rock", chance: 0.22 },
  tundra: { color: [212, 224, 230], base: 0.14, rough: 0.12, prop: "pine", chance: 0.40 },
  peaks: { color: [146, 146, 158], base: 0.55, rough: 0.40, prop: "rock", chance: 0.16 },
};

// Zones are tiles made of tiles. Each zone rolls its biomes from its own short list.
const ZONES = [
  ["meadow", "forest", "forest", "lake"],
  ["desert", "desert", "mesa"],
  ["tundra", "tundra", "peaks", "lake"],
];

// Integer hash to [0, 1): the same grid square and seed always give the same number.
function hash2(ix, iy, seed) {
  let h = Math.imul(ix, 374761393) ^ Math.imul(iy, 668265263) ^ Math.imul(seed, 1442695041);
  h = Math.imul(h ^ (h >>> 13), 1274126177);
  return ((h ^ (h >>> 16)) >>> 0) / 4294967296;
}

// One point per grid square, pushed away from the center by up to `jitter` (0 to 1).
function cellPoint(ix, iy, jitter, seed) {
  return [
    ix + 0.5 + (hash2(ix, iy, seed) - 0.5) * jitter,
    iy + 0.5 + (hash2(ix, iy, seed + 1) - 0.5) * jitter,
  ];
}

// Cell noise: the two closest points to (x, y), plus the distance to the wall between them.
function nearestCells(x, y, jitter, seed) {
  const gx = Math.floor(x), gy = Math.floor(y);
  let d1 = Infinity, d2 = Infinity, a = null, b = null;
  for (let j = -1; j <= 1; j++) {
    for (let i = -1; i <= 1; i++) {
      const [px, py] = cellPoint(gx + i, gy + j, jitter, seed);
      const d = (px - x) ** 2 + (py - y) ** 2;
      if (d < d1) {
        d2 = d1; b = a;
        d1 = d; a = { ix: gx + i, iy: gy + j, px, py };
      } else if (d < d2) {
        d2 = d; b = { ix: gx + i, iy: gy + j, px, py };
      }
    }
  }
  const wall = (d2 - d1) / (2 * Math.hypot(b.px - a.px, b.py - a.py));
  return { a, b, wall };
}

function smoothstep(t) {
  t = Math.min(Math.max(t, 0), 1);
  return t * t * (3 - 2 * t);
}

class BiomeStack {
  // opts: tileSize, jitter, warp, warpScale, blend, zoneSize (all in blocks except jitter, zoneSize in tiles)
  constructor(seed, opts) {
    this.seed = seed;
    this.opts = opts;
    this.noise = new Perlin(seed);
    this.tiles = new Map();
  }

  // 1. Domain warp: push the sample point around with two noise fields before looking it up.
  warp(x, y, time = 0) {
    const { warp, warpScale } = this.opts;
    if (warp === 0) return [x, y];
    const f = 1 / warpScale;
    return [
      x + warp * this.noise.fractalNoise(x * f, y * f, time, 3),
      y + warp * this.noise.fractalNoise(x * f + 5.2, y * f + 1.3, time + 9.7, 3),
    ];
  }

  // 2. Which biome is this tile? Find the zone tile that holds the tile's point, then roll.
  tile(cell) {
    const key = cell.ix * 65536 + cell.iy;
    if (!this.tiles.has(key)) {
      const z = this.opts.zoneSize;
      const zc = nearestCells(cell.px / z, cell.py / z, 0.9, this.seed + 7).a;
      const zone = Math.floor(hash2(zc.ix, zc.iy, this.seed + 9) * ZONES.length);
      const list = ZONES[zone];
      const biome = list[Math.floor(hash2(cell.ix, cell.iy, this.seed + 3) * list.length)];
      this.tiles.set(key, { key, zone, biome });
    }
    return this.tiles.get(key);
  }

  // 3. Sample one block: warp, cell noise, then blend the height across the tile edge.
  sample(x, y, time = 0) {
    const { tileSize, jitter, blend } = this.opts;
    const [wx, wy] = this.warp(x, y, time);
    const near = nearestCells(wx / tileSize, wy / tileSize, jitter, this.seed);
    const tile = this.tile(near.a), other = this.tile(near.b);
    const wall = near.wall * tileSize; // blocks to the tile edge
    const detail = this.noise.fractalNoise(x / 90, y / 90, 0.5, 4);
    const A = BIOMES[tile.biome], B = BIOMES[other.biome];
    let height = A.base + A.rough * detail;
    let mix = 1; // 1 = all this tile's biome, 0.5 = halfway, right on the edge
    if (blend > 0 && wall < blend && tile.biome !== other.biome) {
      mix = 0.5 + 0.5 * smoothstep(wall / blend);
      const hb = B.base + B.rough * detail;
      height = hb + (height - hb) * mix;
    }
    return { tile, other, wall, mix, height };
  }
}

// 4. Props on a point grid: one jittered candidate every `spacing` blocks, kept by simple rules.
function scatterProps(stack, width, height, spacing, time = 0) {
  const props = [];
  for (let gy = 0; gy * spacing < height; gy++) {
    for (let gx = 0; gx * spacing < width; gx++) {
      const [px, py] = cellPoint(gx, gy, 0.9, stack.seed + 11);
      const x = px * spacing, y = py * spacing;
      const s = stack.sample(x, y, time);
      const rule = BIOMES[s.tile.biome];
      if (!rule.prop || s.height < 0.02) continue; // pattern: needs dry ground
      const clump = 0.5 + 0.5 * stack.noise.noise(x / 60, y / 60, 3.3); // occurrence: clumps
      if (hash2(gx, gy, stack.seed + 13) < rule.chance * (0.3 + clump)) {
        props.push({ x, y, kind: rule.prop });
      }
    }
  }
  return props;
}
To use it, create new BiomeStack(seed, { tileSize: 120, jitter: 0.8, warp: 60, warpScale: 130, blend: 32, zoneSize: 3.2 }), then call stack.sample(x, y) for each block and read .height and .tile.biome. scatterProps(stack, width, height, 12) returns the props. To turn the height map into a 3D density field, scale the height to blocks and subtract each block’s y. Wherever the result is positive, the block is solid, the same sign convention Hytale uses.
Companion tutorial
Build the whole biome generator yourself
- Simplex noise from scratch, stacked into fBm
- Domain warping, plus ridged and billow noise
- Heat and moisture maps that feed a biome table
- Voronoi biome regions with wobbly, blended borders, chained into one density stack
- Code in JavaScript, C# and C++, plus pseudocode
What This Means for Indie Devs
Tiles are a team-size decision. One global formula is fine when one person tunes it. Self-contained biome tiles let several people work at once, each on their own biome. That fits a studio whose level design team for world generation has doubled in size, and it works just as well for a solo dev who wants to add a biome without retuning the whole world.
Build the debug view first. Hypixel’s density docs are blunt about it: “Currently the Hytale Node Editor does not support noise visualization.” Worlds do live-reload in game while you edit, but seeing each node’s output in 2D is what makes a stack debuggable. The lab’s Tiles and Height views took a few lines each.
Blending is a budget. Hytale’s docs put a performance price on wider transitions and call GradientWarp expensive. Spend both where players will notice the seams.
Point grids are good enough. A jittered grid plus a few rules places hundreds of props on this small map in a few milliseconds. Reach for fancier sampling when you can see the problem, not before.
The big idea is old and small: chop the world into tiles, give each tile one job, and hide the seams. Hytale’s version runs on a node graph built by a growing team. Yours can start with 120 lines and a canvas. Which game should we take apart next? Tell us in the comments.
Sources & Further Reading
- Hypixel, news: The Future of World Generation (January 5, 2026) · Hytale Patch Notes, Update 2 · First Look: Chapter 1 and More · Community Spotlight: WorldGen V2 · Modder-Facing Patch Notes, Update 7
- Hypixel, docs: Hytale Generator node reference (Density, Positions Provider, World Structure, Prop) · Density Generation Concepts · How to Edit and Create Biomes
- Community: HytaleModding, community guides plus a mirror of the official docs
- Domain warping: Inigo Quilez, “Domain Warping”
- On Game Genius Lab: Perlin noise · Voronoi diagrams · Procedural biome generation (the companion tutorial)
This Post Has 0 Comments